
As promised, I have written a guide to help you parents with teaching your children how to write. You can use this whether you are homeschooling or adapt to use with your school’s curriculum if you are distance learning. Writing is going to make up the remaining 30-45 minutes of your child’s English Language Arts instruction that I referred to in previous posts.
See Related: Back to School Support for Parents
See Related: Book Recommendations for Children
Some of the links in this post are affiliate links. If you click and shop through them, I earn a commission at no additional cost to you. These commissions help support this site so I can bring you more content like this post. Thank you for your support. Full disclaimer here.
Writers’ Workshop
When you are preparing to teach your children to write, keep in mind that they will spend the majority of their writing time working independently and on various projects. Teachers refer to this as Writers’ Workshop. You will, therefore, want your children to have a folder where they keep their work.
I recommend a 3-prong folder with two pockets. The front pocket is where they will keep all of the pieces they are still working on. When I was teaching, I labeled this side with a round green sticker to help them remember. The back pocket is where they will keep all of their finished pieces. I labeled this side with a round red sticker.
For the three prongs, I inserted resources inside of a plastic sleeve that aided my students in being able to work independently. Specifically, I kept a sound chart in the sleeve. A sound chart is each letter of the alphabet with a picture that reminds children of what sound the letter makes. Sound charts help children to sound out words they need to spell. Download a free sound chart here: ABC Chart. On the back of the sound chart, I provided a graphic organizer where students recorded all of the topic ideas that they could refer to whenever they were ready to write a new piece. More on graphic organizers later.

Writing Standards
When teaching your child to write, they will have to learn not just handwriting (penmanship), but also how to write in the different genres: narrative, informational, and opinion. It is therefore helpful to think long-term as you will want to teach a unit on each style of writing. Typically, teachers start with narrative writing, specifically, personal narratives.
Teaching Narrative Writing
The important thing to remember when teaching narrative writing is that children in kindergarten through second grade should write about things that actually happened to them, or personal narratives. At the end of second grade, students can begin attempting to write realistic fiction. Third graders and up can write a combination of both personal narratives and fiction, including fantasy.
If you have a kindergartener, they will begin with oral storytelling. Once they have the hang of being able to orally tell you a story beginning, middle, and end, they can begin writing the story using pictures. Teach them how to use simple shapes (circles, squares, rectangles, triangles, and ovals) to draw people, animals, and things. A great book that can aid in this is David Goes to School (This is also a good book to teach or review appropriate school behavior; get a copy here.). Have them draw a picture of what happened at the beginning, in the middle, and at the end of their story, all on different pages, to make their books.
As they learn to write letters and sight words, they can begin labeling by writing the word “me” next to themselves in each picture. Then they can start labeling the names of other people (mom, dad) and animals and things in their pictures as they learn more sight words. They can also begin adding sentences as they learn the sight words you should be teaching them each day. Display these on an easel or whiteboard during writing time so that they can add them to their writing.
See Related: Helping Your Child Learn to Read
Regardless of the grade of your children are in, you will want to begin teaching narrative writing by reading aloud narrative books to them for about a week before you expect your children to begin writing their own. Teachers call this immersion because you want to immerse children in the genre that they will be expected to write. Another thing that you will to do during this week is write a narrative together with your child about an experience that you shared together. This is called shared writing and provides a scaffold for your children to attempt writing on their own.
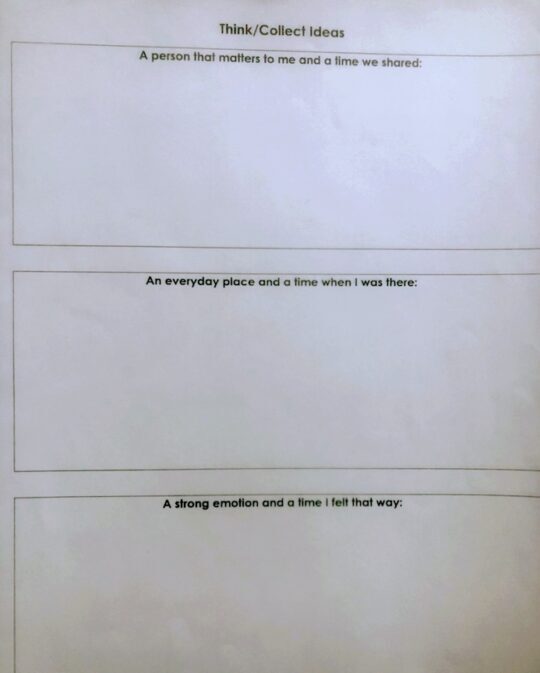
The final thing that you will want to do during this week is to help your children brainstorm ideas for writing topics that they will keep in their plastic sleeve. With my kindergarteners and first graders, I took one day and had my students draw or write about a person that matters to them and at least one time they shared. The next day, they drew or wrote about an everyday place and a time they were there. On the last day, they wrote about a strong emotion they had and a time they felt that way. They made these notes in a graphic organizer that I created for them and referred to it during the independent writing time of Writers’ Workshop (example pictured).
Teaching Informational Writing
There are two types of Informational Writing that you will need to teach your children. In kid-friendly terms, they are how-to books and all-about books. In my experience, all-about books are much easier to teach than how-to books, so I recommend starting there.
All-About Books
The easiest way to teach children how to write an all-about book is to have them choose their favorite animal and write one page for each of these subtopics: what that animal looks like, where that animal lives, what that animal eats, and something about what that animal does. Teach your child how to write a simple sentence to introduce their all-about book and a variation of that sentence to conclude the book.
But first, write an all-about book together on a different animal with all of the same pages. This will help them be able to write their own book, independently.
Finally, they should add details: up-close pictures that are labeled. For example, the page that describes what the animal looks like should include a drawing of what the animal looks like and all of the animals special features should be labeled: Does the animal have horns? Whiskers? A tail? A stinger? That should all be labeled. Older students can write captions to go along with their illustrations. Older children can also add details about where the animal lives. Does the animal live in the Serengeti? The picture should include details that teach “all about” that animal’s habitat.
How-To Books
With how-to books, your job will be helping your child determine what it is that they are an expert in doing. The brainstorming phase of introducing this unit then will be very important. For my students, we spent one day drawing or writing all of the things we know how to play, another day on all of the things we know how to do, and another day on all of the things we know how to make. Again, this was all recorded on a graphic organizer that I stored in their plastic sleeve for reference. You can create this graphic organizer by folding a piece of blank paper into thirds and then have your child label each column with the words: play, do, make.
Another strategy for helping your children write how-to books is to have them name the steps in how to play, do, or make whatever it is that they are teaching others to do in their book. As they name the steps, have them count them out on their fingers. They will then take a page to write about each step. The first page will be an introduction along with a picture of all the things that will be needed for whatever it is they are teaching. The last page will be the conclusion.
As with narratives, you will want to spend the first week introducing each informational unit by immersing your children in informational texts, both all-about books and how-to books. You will also help your children brainstorm topic ideas and do a shared writing together during that first week.

Teaching Opinion Writing
Opinion writing can be taught two ways for kindergarteners: with signs and with letters. Kindergarteners who are not yet writing can create a sign that expresses their opinion such as “knock first” for their door. For kindergartners who are writing and children in first and second grade, they can write letters for something they think should change or for something they want. For example, they may think their school should be open (or closed) during the pandemic. They can write a letter expressing that opinion and then write three reasons, one on each of the next three pages supporting it, and end with a conclusion. Or they may write a letter to you requesting a later bedtime or a letter requesting a certain toy or game they want or place they want to visit. Again, they would write reasons on each page to support their opinions.
Older children can write a review of a book, restaurant, a place they visited, or a movie. Have them write whether or not they would recommend the book, place, or thing to a friend and then state their reasons. They could also write letters (and send them) on issue for which they have an opinion and state their reasons supporting why the changes should be made.
As with the other genres, you will immerse them in this genre and then help them collect ideas and plan for their writing. Have students brainstorm things they think should change at school (or in the world) and at home. Then have them brainstorm things they want and think they should have. Again, they should record their ideas on a graphic organizer to keep in their folders.
Planning for opinion writing is similar planning for how-to writing: have your children say their reasons, counting them out on their fingers. However many reasons they have is how many pages they should write (plus an introduction and conclusion).
The Writing Process
For most pieces of writing, your child should go through each stage of writing: brainstorming; planning; drafting; revising; editing; and publishing. Therefore, you will need to spend time each day teaching them about whatever stage they are on before they begin their independent writing time. This lesson should be quick (no more than 15 minutes), so they are called mini-lessons by teachers.
I have already given you some mini-lessons for the first week: reading books in that genre; brainstorming topic ideas and recording it on a graphic organizer; and doing a shared writing each unit.
Other mini-lessons:
- For narrative writing, you can teach children to touch each page and say what will happen to ensure that their story has a beginning, a middle, and an end.
- For informational writing, you can do a mini-lesson on adding a table of contents and/or a glossary page.
- For opinion writing, you can do a mini-lesson on using sequence words: first, next, then, last.
- For revising lessons, you can teach your children to read their pieces out loud and ask themselves if what they have read makes sense. If it does not, have them identify how they can fix it. Teach them how to use a caret so they do not have to rewrite their entire draft.
- For drafting, you can teach your children how to use their sound chart to figure out how to spell words phonetically so that they do not get stuck trying to figure out the proper spelling.
- For editing, you can teach your children that this is when they fix up punctuation, capitalization, and spelling errors.
- For publishing, you can teach your children how to make covers for their books and even an About the Author page. I have also taught my students they had to use a minimum of five colors when coloring their illustrations.
For every mini-lesson, you should demonstrate it on your shared writing, therefore, plan to take that piece of writing through each stage.
There are many other mini-lessons that you can do with your children. Look for what they have trouble with while writing independently and then make that your next mini-lesson to start off the next writing session.
Not every piece of your children’s writing will be published. For the pieces that are, make time to have your children read them to an audience, even if that is only you. Every week, my class had Author’s Chair. During this time, students could volunteer to read their published books to the rest of the class and then take questions and comments from the audience. This was good opportunity for the students to practice their speaking and listening skills; for those sharing their work to build up their confidence; and for those listening to be inspired in their own writing and/or to share their own work. It was a favorite activity for all.
Conclusion
A word about kindergarten: while they are learning to tell stories orally and then with pictures, they should also be learning to write their name along with the letters they are learning each day. For those who do not know how to write their name at all, begin by having them just trace their first name. Each week, you can remove a line of tracing and have them write their name until eventually, they have no lines of tracing and are only writing their name. When they have learned to write their first name, add their last name. You can make and print free handwriting pages for them here: Handwriting Practice.
There is far more to teaching writing than I have included in this guide. I just wanted to give you the major pieces with enough information that you can fill in the rest.
Have fun teaching your children how to write and know that as their reading improves, so will their writing; they go together!
Until next time,

Pin it!
Please share!


So much yes here! I can write stories all day but when it comes to teaching my children to write, I struggle. Thank you for the valuable resource. I have this pinned to go through in more detail later.
Thank you, Jessann! It definitely takes a different set of skills to help children with writing so I hope that this proves to be helpful. Thanks for sharing! 😊
Such great information for learners learning how to write. This can help a lot of kids
Thank you, Ashley! I hope so! 🙏🏽
I’m not a parent but I’ve been a teacher for a while and I think this is a great post! You definitely hit all the main points of teaching writing. Writing is so important. It makes me sad that some schools I have worked at don’t focus on it as much as they should 🙁 Teaching them to write at home is great.
That’s right, you are a teacher, too! 🤗 Thank you; I am glad I didn’t miss any major components. 😊 Writing is definitely important; being able to communicate in writing is freeing.
This is such an amazing resource! Thanks for putting it together!
You are welcome! I’m glad it’s helpful! 😊
I must say, wonderful! All of these are great tips for me to inspire my son. Thanks for sharing @
Thank you, and you are welcome! 😊
This is such an important post specially during these times. Kids shouldn’t lose out on their learning and writing is essential to one’s growth. Thank you for sharing!
Thank you! Yes, children should definitely not miss out on their learning. I hope these strategies help!
This is so much information I had to read it twice! My step daughter is starting 4th grade and I know there will be so much more homework for us to help with! Thank you for the tips!
You are welcome! I tried to simplify it as much as possible, but there is so much involved in teaching writing. I hope you find it helpful. 😊
[…] See Related: How to Teach Your Child to Write […]